
Newspaper Inspired Nails - Tutorials.
Hello My lovelies so I am back with another blog post and this one is a tutorial for a look which I personally love. When I studied my hair and beauty Diploma I had seen this look on celebrities featured in magazines etc and I thought it look so cool. It looks really vintage which is obviously a really in look at the moment.
I never really took a lot of time at researching how to do this look and never attempted as I thought that you would have to be a professional to do. Although practise makes perfect and your nails will obviously improve over time it is a look which we can all try out at home. You don't need any special materials its a quick simple look, but you'll be sure to get comments on it as it is just so different.
I'd like to point out that the picture directly to the left are not my nails but all other picture are my own. So if you want to learn how to get this look then just keep reading:)
What you will need:
♥ Nail File
♥ Base coat
♥ Nail polish ( colour of your choice)
♥ A page out of the newspaper
♥ A cup of water
♥ Top coat
Get the look
 |
| 1) File nail to the shape and length you want. |
1) Prepare the nail - So the first step is preparing the nail. Here you want to remove any traces of old nails varnish - make sure you get right to the edges as you don't want to be getting a build up of nail varnish in the corners. Now that the whole nail bed is trace free this is the perfect time to push those cuticles back revealing as much of the nail bed as possible. Whip out those cuticle nippers and get rid of those cuticle (If you're new to this then please take your time to avoid ripping the skin.) In the ideal world let your nails breath a day with so nail varnish and apply cuticle oil, this is how you can keep your nails to their healthiest, however don't worry if you haven't got time to do this - or if you're like me you're just too desperate to try out the new look. Now file down your nails to a shape and length that suits you. I personally love having my nails reasonably short and squared off, but please do remember squared off nails are a lot more likely to chip. Now is the time to apply a base coat and let it dry properly.
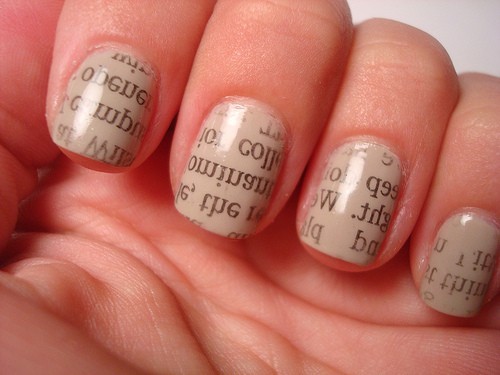
2) Apply base coat colour - So this step is pretty self explanatory you're simply going to paint your nails with the colour you want to have under the newspaper text. I used a tan colour ( Barbara Daly nail polish in the colour "Whimsy".) This is the typical colour to use for the newspaper nails as it follows the vintage and retro theme, but keep your options open I also think it would look lovely with a lilac colour or pastel blue. Make sure to take your time applying the colour as this really is the base for your look. So do two coats and make sure you let those nails dry well girls:)
3) Get that print on - So now we have the base colour on we're ready to get the newspaper print on and here is where my technique is different to the majority of newspaper nails which use alcohol to transfer the print on to your nails. I always want to share techniques which I know you'll be able to

complete at home. You won't need to go to the shop and buy anything. Simply cut out a few pieces from the newspaper - slightly larger than nail size. Choose pieces with lots of text on. Once the base colour is completely dry simply dip the piece of nespaper into a cup of water - yes WATER. Give the piece of paper a little shake because you don't want it dripping wet. Place the piece onto the nail (Text facing the nail.) Now hold it onto you nails for about 20 seconds and press firmly pushing all over the nail. carefully peel the piece of paper away from the nail. Do all your nails.
3) Lock in that look - Please don't panic if at this stage your nails aren't looking amazing, you may not be able to see the text properly and it may look white as if all of the paper has stuck to the nail, but have faith I know what I'm talking about. When you placed the wet piece of newspaper onto your nail the top layer transferred onro rhw nail, not just the text it will also contain a very thin layer of paper, as the transfer dries all you'll be able to see are the fibres of paper and now the text, so we need to lock in some moisture. This is where our top coat comes in at it is essential to this look. I love applying the tope coat as its almost magical. You need to try this look just to the the newspaper text magically appear on your nails when applying the top coat. Let the top coat dry completely and there you go!!!
Please go try this look right now I can tell you, you won't be dissappointed I know I love it I just love

how many comments you will get on you're nails, it looks as if you've tried so hard or even paid a visit to your local nail salon, but it is SO easy and quick once you've done it once you won't understand why you hadn't done it before. I promise you I am not very artistic or creative I can have amazing ideas in my head but when It comes to doing them they turn out a disaster but this look isn't hard, you wont make a mess, you won't need to go buy any extra material, equipments or colours. So please try it. Leave me a comment if you've tried it or if you have any questions:)
I love discovering new looks so please keep your options open and dont be afraid to experiment with colours and ideas and techiques at the end of the day what have you got to lose the worst that can happen is that you have to wipre it off and start again. I am currently on the look out for something cute in the newspaper such as hearts or little cartoons as I think it'll look so cool to transfer that on to my nails.
So I really hope you try out this look and that you have fun with it and mostly that you're proud and happy with your creations.
Be happy and stay positive
Until next time
Speak to you soon
xoxox
*** For business enquiries only (please) contact me on inspirelatin@gmail.com
No comments:
Post a Comment